
In this post, I’m not going to explain how each of these structures work in detail (but I will link to other articles that do the job for me). Instead, we’re going to discuss which outlines will work best with your particular style of story creation.
But first, what is an outline structure?
Your outline structure is what holds all the threads to your story together outside of your head. It’s how you remember what’s next, where you’re going, and how you plan to get there. It can be as simple as a summary paragraph or as complex as a scene-by-scene description of the whole book. Regardless of how in-depth you wish to go with your outline, any outline should accomplish three things:
- Establish the beginning, middle, and ending milestone of the story.
- Provide a means for you to track your character’s progression alongside the plot’s progression.
- Define the tone of the story, aligning the narrative voice with the humorous, introspective, horrific, or epic spirit of the story.
Everyone’s writing style is different. For some, it’s all about the journey, not the destination. You have a general idea of where you want to end up, but you’re fine with finding the path without a map. For others, if the scene doesn’t pre-meditatively accomplish at least three things for the story’s overall progress, they won’t even entertain the idea of writing it. For such a wide spectrum of creation styles, why should we assume that one outline structure is better than another?
Let’s look at four popular outline structures and dissect when they’re most useful and whether or not it’s right for your particular project. We’ll discuss the Series Grid, the Seven-Point Plot Structure, the Three-Act Structure, and the Snowflake Model.

What it Is
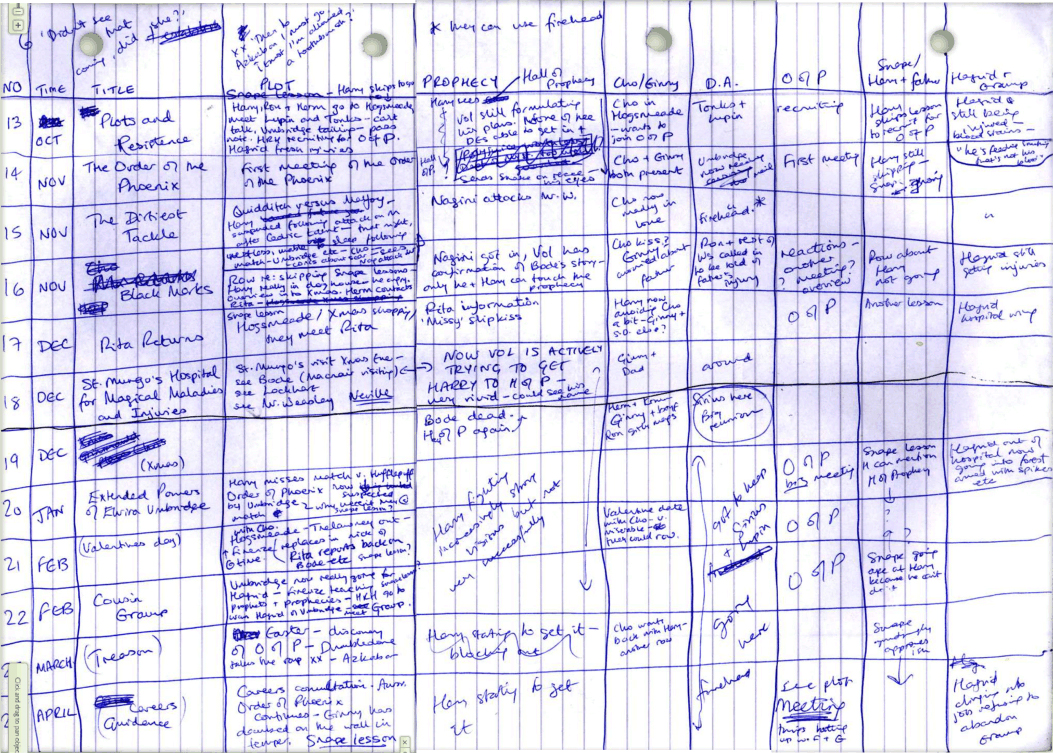
The Series Grid is the most intuitive outline in this post, and it’s the one that takes the most legwork to set up properly. It’s best known for J.K. Rowling’s use of the model when outlining Harry Potter and the Order of the Phoenix. It’s also been famously used by Joseph Heller when outlining Catch-22 in 1961. The outline uses at least 5 columns, one each for: (A) chapter number, (B) time, (C) chapter title (if applicable), (D) POV character (if applicable), (E) plot summary. The additional columns are for your subplots. You detail the chapter’s plot in the column E, giving a brief description of what happens in that chapter. Then, in columns F through whatever, you detail how your various subplots interact with the main plot of that chapter.
For example, here’s a picture I borrowed from The Better Novel Project that transcribes a bit of Rowling’s outline. The plot column details what happens in the chapter, but the following columns talk about how that relates to the prophecy, the love triangle, and the secret organization. It’s a great tool to see if any of your subplots are silent for too long and to see how your many story elements weave together.

WHo It’s Good For
Shout out to all the plotters and architects on the web! If you’re a detailed planner who wants to know all the ins and outs of your story from beginning to end, this outline is for you. It’s best used when working with a story that has a lot of subplots and shuffles around POV characters. Oftentimes your various characters will have their stories intertwine at some point in the novel, and the Series Grid is a great way to ensure you do enough front work to make those interactions feel natural and well earned. You can also use columns to track your characters’ arcs throughout their interactions with your plot points.
If you want a free template for this outline, check out my Ultimate Novel Database freebie on my resources page.
What it Can’t Do for You
The Series Grid is a powerful tool for seeing the entire novel from a bird’s eye view. However, it removes much of the freedom and flexibility that other, simpler outlines can offer. Yes, you can update and tweak the outline as you write and evolve your story, but there are a lot of details to keep track of in a structure like this. If your story has a more straight-forward premise or has a lot of structural elements you’d rather discover along the way, this outline will only get in your way.

What it Is
The Seven-Point Plot Structure is an excellent way to draft a story that tracks the arc of a central problem or character rather than a lot of smaller conflicts and intrigues. Starting with the end in mind, you determine the key milestones on your hero’s journey that will ultimately lead to their victory or transformation. Dan Wells does an excellent video series explaining this outline structure. You can access the first of five videos on youtube here.
Like Dan Well’s video series, we’ll use the first Harry Potter book, Harry Potter and the Sorcerer’s Stone, as the plot example while we define the seven points.

- Hook — the opening story element that makes the reader ask, “What happens next?” It can be a “change” in the normal way of life, an intriguing character, or an introduced mystery. Something that hooks the reader into the rest of your story.
- Harry Potter lives in a cupboard under the stairs.
- First Plot Point — the result of the inciting incident and the start of the protagonist’s journey. [about ¼ way into the story]
- Harry discovers he’s a wizard and is invited to attend Hogwarts School of Witchcraft and Wizardry.
- Pinch Point #1 — pressure on the protagonist to solve a problem that will announce his destined state of being (hero status). The main villain can be introduced here, but that’s not always the case.
- Harry, Ron, and Hermione fight the troll in the girl’s bathroom on Halloween.
- Midpoint — the protagonist moves from reacting to the events around him/her to acting on his/her own accord. [about ½ way into the story]
- Harry decides that anyone who drinks unicorn blood must be opposed.
- Pinch Point #2 — the protagonist reaches his/her lowest point and fails. Something happens to provide motivation for the protagonist to fight.
- Ron and Hermione fall into the traps on their way to finding the Sorcerer’s Stone, leaving Harry to continue alone.
- Second Plot Point — the protagonist is given the final piece of the puzzle so that everything comes together so the protagonist can finally face their opposition (villain) and overcome them. [about ¾ way into the story]
- Harry realizes that, because his heart is pure, the Sorcerer’s Stone is in his pocket and that if Voldemort touches him, it will hurt Voldemort instead of him.
- Resolution — the climax of the story, then followed by the resolution. This can be character- or plot-based, or even just a new state from the beginning. Either the protagonist finally makes the moral change needed to be a better person, or the last battle occurs and the plot is resolved, or the state of the world or narrator has shifted in some dramatic way (in the end of “Tale Tell Heart,” the narrator is insane).
- Harry defeats Voldemort and learns the true meaning of bravery and friendship.
WHo It’s Good For
Have an awesome ending in mind but you’re not sure how to get there? The 7-Point Plot Structure works best for writers looking to effectively build to a predetermined resolution throughout the beginning stages of your book. Writers who use this outline all say to start with the end in mind, defining first your resolution before creating your hook. The idea is that every milestone in your book points to the coming end, unlike the Series Grid which works at weaving multiple storylines and cascading their endings throughout the novel’s overall plot. It’s a simple, powerful outline for keeping your story on track. And how you get from point to point? Well, you can plan that or discover the journey along the way. In fact, you can make a 7-Point Plot for each of your main story threads and weave those outlines together, if you wanted to include multiple viewpoints or subplots.
What It Can’t Do For You
Subtlety is not the name of the game with this structure. If you have lots of subplots, minor character growth you feel compelled to chart, or wish to see a level of depth in your notes akin to the Series Grid, this isn’t your outline. Its one-track mind is great for driving the main storyline, maybe even a few major characters, but it’s just fluid enough to prevent you from accurately predicting all your scenes yet also just rigid enough where you need to know where you’re going. So if you have a cast of great characters you want to plant and watch how they grow, leaving their destination a mystery to you, this outline will drive you nuts and won’t do well to serve you.

What it Is
This is the classic story outline taught in high school writing classes. Its simple composition of beginning (set up), middle (confrontation), and end (resolution) can be translated into a number of varying formats, from detailed paragraphs to economic charts. In essence, all Three Act stories follow the basic story pattern: introduce your hero, the inciting problem pushes them to adventure, they experience problems, grow as people and heroes, face their opponent, and win the day. Now, that sounds like a fairy-tale, but the pattern can be applied to all genres of literature. There’s no set number of plot points you need to hit or subplots you need to juggle, just a pure, proven story arc as old as time itself.

Who It’s Good For
What’s great about the Three-Act Structure is that its simple form can truly be scaled up or down without limit. So long as you have an idea for the grand scope of your story, you can work with the Three Act structure as you flesh out the finer details in your first draft. Screenwriters use this outline all the time, using its simple division of theme (discovery, challenge, and victory) to write epic movies that’ll make you cheer and bring you to tears. The structure also works well for anyone who best outlines their books in monologue paragraphs, writing first detailed summaries of the entire plot before moving into chapter drafts.
What It Can’t Do For You
Do you struggle with writing engaging middles? The Three Act structure may not be for you. It’s the same if you want to divvy out the various threads of your plot and track them all individually. And if you have trouble devising engaging ways to create conflict within the smaller arcs of your story (like the try-fail cycles and character growth) that increases appropriately for the pace of your story, this outline will give you some trouble. The Three Act structure is best used for storytellers with an instinctual gift for plot, not those struggling to carry the “middle bits” of the journey.

What it Is

Want to plot your novel, but don’t want to be confined to a rigid structure? The Snowflake Method, developed by writer Randy Ingermanson, is the most organic of the outline structures on this list and probably best suited for pantsers and other gardeners out there. You start with an idea, a one-line pitch for your story, and build from it your characters, plot, and tone. By the time you’re finished, you won’t have to worry about running into any plot holes or dead ends because your snowflake model has caught them all.
There are 10 steps to using the Snowflake Method. You can click on the image to the right or on Randy’s name above to check out his awesome book that details the whole process, but for now we’re just going to do a brief overview of the steps:
- One Sentence Summary: write a one-sentence summary of your entire book. This sentence will serve as your guideline for the rest of the process as well as your elevator pitch when telling people about your book.
- One Paragraph Summary: expand your sentence into a paragraph detailing the story’s main characters, plot, conflict, and ending. Touch on the major points of conflict your characters will have to overcome in their journey, both internally and externally.
- Character Summary: take each of your main characters and write a short summary for them, detailing their name, a one-sentence summary of their storyline, their motivation, their tangible goal in the story, their ending epiphany (what do they learn or discover in the story), and a one-paragraph summary of their storyline.
- One Page Summary: now to dive into the specifics of your plot. Take each sentence from your paragraph summary and turn that into a paragraph summary, expanding on that particular story element. Note: all but the last paragraph should end in some form of disaster or major conflict to keep the story’s action rising. The last paragraph is the resolution of the story, where everything comes together at the end.
- Character Sketches: expand the summaries you’ve written for your characters into half-page sketches. Expand on their motives and perspective of the story, writing a paragraph or two that tells the story from their point of view to better help you understand their perceived and actual role in the story at large.
- Expanded Plot Synopsis: here you’ll be taking each paragraph from your one page summary and expanding them into roughly a page. This synopsis should be between four and five pages. Use this synopsis to make all the strategic decisions for your plot, figure out exactly how your characters will interact with your conflicts, etc. If you have to go back and revise any previous steps, do so now.
- Character Charts: take the information you wrote down for your characters in the sketches and expand that into a full-on character chart, detailing all the little information like their birthdate, physical description, childhood highlights and lowlights, preferences, and any other information you can think of for your characters. After a few pages, you should know these people better than you know yourself—well, almost.
- Scene Sketches: looking at your expanded plot synopsis, write a summary for each scene in the book. This can be one sentence each, detailing the main action and character element for each scene. (You can always apply the Series Grid at this point, if you want!)
- Long Synopsis (Optional): Not every writer who uses the Snowflake Method does this, including now Randy himself. But if you want, go through and turn each sentence summary of your scenes into paragraphs. You’ve essentially, at this point, written a really light version of your book. I’d recommend only doing this step if you have an idea for the setting and tone of each scene and you don’t want to forget about it after you get into the first draft. If you don’t feel like you need this, then move on to step 10.
- Write Your Book!

Who It’s Good For
Calling all pantser and gardener converts! This snowflake model is thorough, but it follows the organic growth of your mind and allows you to water an idea and watch it sprout into your novel. It’s basically discovery writing, without all the dialogue and angrily scratched-out drafts.
What It Can’t Do for You
If you already have a firm idea for your characters and plot devices, this outline may be a little too tedious for you. The Snowflake Method builds off a single idea, allowing subplots to crop up wherever they’re planted. There’s no good way to track multiple point of view characters or strategic foreshadowing with this method—at least not in the way the Series Grid or Seven-Point Plot Structure can do it.
Write on, writer.
Need help plotting your novel?
Schedule a coaching call today!
In one session, we’ll work together to find your novel’s why so we can cast your characters, plot out your chapters, and create a writing schedule to put you on track to finishing your first draft this year.


Amber Helt is the managing editor and writing coach at Rooted in Writing. She has her Bachelor of Arts in creative writing with certificates in French and linguistics. She’s the co-chair of the North Texas chapter of the Editorial Freelancers Association and teaches workshops on writing and editing throughout Dallas. Amber writes dark fantasy and is currently working on her novel, Grimm Reality.
You can hang out with her on Instagram and Twitter @Amber.Helt.
